Camera tracking involves sharing sound location data from Nureva® audio conferencing systems with selected third-party cameras. This type of integration allows a camera to steer its view based on the microphone pickup in the room.
What is sound location data and why is it helpful?
Nureva audio systems are powered by Microphone Mist™ technology, which provides clear and consistent full-room microphone pickup. By filling a space with thousands of virtual microphones, Nureva systems provide accurate data on where people are talking within the room. This sound location data is used to steer the views of selected third-party cameras, allowing remote participants to follow conversations and see who is speaking easily. This data can also be used to switch between cameras in a multi-camera room automatically.
Supported integrations
Nureva has collaborated with leading camera companies to integrate sound location data with supported cameras. Integration requires configuring the Nureva App or Nureva Console and setting up the third-party camera’s software.
Supported integrations for camera switching and tracking
HDL310 and HDL410 systems
Required before starting
One of the following Nureva audio conferencing systems:
HDL310 or HDL410 with firmware version 1.2.2 or newer.
The Nureva App or Nureva Console cloud set up to manage the Nureva system.
A third-party camera with integration software that supports using sound location data.
A review of the user guide for the third-party camera.
Enabling local integrations for camera tracking
Nureva App
Launch a web browser and open the Nureva App.
Log in to the Nureva App.
On the home page, open Settings.
Open Local integrations.
Move the toggle to the right to Enable integrations.
Enable local integrations by sliding the toggle to the right.
When integrations are enabled, Network integration settings will become active.
Nureva Console
Launch a web browser and go to the Nureva Console sign-in page.
Sign in to Nureva Console cloud.
In the Devices dashboard, scroll down to the Integrations section.
Open the Local integrations menu.
Enable local integrations by sliding the toggle to the right.
Press the Apply button.
When local integrations are enabled, a notification indicates the feature is active.
Note: Zone data configuration on the coverage map is an HDL410 feature. This feature is not available for other systems. Sound location data may not appear if sound is not generated in a room.
Configure third-party camera software
When local integrations have been enabled in the Nureva App or Nureva Console cloud, the camera will begin to receive sound location data. Each camera’s setup is unique, with some requiring specific settings to be adjusted or data to be entered. Consult the user guide for the camera and its companion software for information about setting up camera tracking or sound location features.
Before starting
Find out from the camera manufacturer which version of the software is required and whether there is an additional cost to use the software or features.
Review the user guides for the third-party software.
Requests for hostname and port number
Some third-party cameras will require the hostname and port number to be manually entered. This information is available in the local integrations dashboard below the toggle that enables integration. Buttons are available for copying and pasting the information into the camera software.
Nureva App | Nureva Console |
|---|---|
|
|
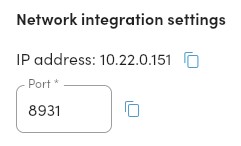
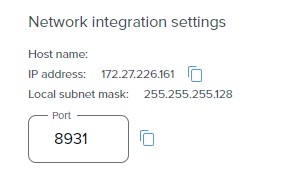
Note: The port number is configurable and can be set to an open port on the network.
Allowing device access to sound location data
Local computer connections are allowed by default. In some cases, allowing access to the sound location data for specific hostnames and IP addresses will be necessary. The additional hostnames and IP addresses can be entered into the field below the network integration settings information.
Note: Hostnames and IP addresses can be removed by clicking the ⊗ next to the entry.
Troubleshooting
If the Nureva App or Nureva Console cloud is unable to start local integrations, a notification with issue details will be shown.
Verify that the port is not already in use.
If the port is already in use, enter a valid number for an open port.
Verify that the hostnames and IP addresses have been entered correctly.
If the Nureva App or Nureva Console cloud is not reporting any errors, but local integrations are not functional:
Consult with the third-party camera’s technical support.
Contact the Nureva support team if additional assistance is needed.
How should the HDL410 microphone and speaker bars be mounted?
For the HDL410 system to provide the most accurate sound location data, Nureva recommends that the microphone and speaker bars be installed on opposite or perpendicular walls. Positioning the microphone and speaker bars this way produces accurate X and Y data.
Recommended installation options for using sound location data from the HDL410 system are shown in the diagrams below.
|
|
|
|---|---|---|
|
|
|
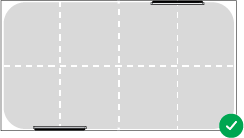
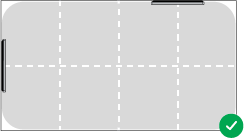
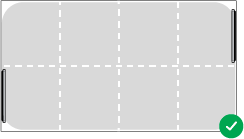
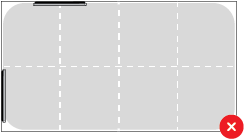
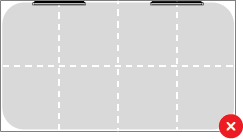
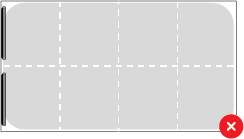
Note: The HDL410 microphone and speaker bar placement shown above is for optimum sound location data accuracy. Also refer to Microphone clearance requirements and recommendations.
HDL300 and Dual HDL300 systems
Required before starting
One of the following Nureva audio conferencing systems:
HDL300 or Dual HDL300 with firmware version 3.1.9 or newer.
Nureva Console (cloud or client):
Desktop client version 2.6.201042 or newer.
Nureva Console cloud account.
A third-party camera with integration software that supports using sound location data.
A review of the third-party camera’s user guide.
Enabling local integrations for camera tracking
Nureva App
Note: Zone data configuration on the coverage map is a feature specific to the HDL310 and 410 systems. This feature is not available for HDL300 or Dual HDL300 systems.
Launch the Nureva App using the desktop shortcut.
An alternative is to open a browser and use a localhost connection or the device’s IP address.
The Nureva App home page will open.
The HDL300 or Dual HDL300 system will be automatically detected.
Open Settings followed by opening the Local Integrations menu.
Enable local integrations by sliding the toggle to the right.
Local integrations are enabled and the feature is active.
Nureva Console
Note: Zone data configuration on the coverage map is a feature specific to the HDL310 and 410 systems. This feature is not available for HDL300 or Dual HDL300 systems.
Go to console.nureva.com in a supported browser.
Log in to Nureva Console cloud.
From the Devices dashboard, scroll down to the Integrations section.
Open the Local integrations menu.
Enable local integrations by sliding the toggle to the right.
Press the Apply button.
When local integrations are enabled, a notification indicates that the feature is active.
Configure third-party camera software
When local integrations have been enabled in Nureva Console (cloud or client), the camera will begin to receive sound location data. Each camera’s setup is unique, with some requiring specific settings to be adjusted or data to be entered. Consult the user guide for the camera and its companion software for information about setting up camera tracking or sound location features.
Before starting
Find out from the camera manufacturer which version of the software is required and whether there is an additional cost to use the software or features.
Review the user guides for the third-party software.
Requests for hostname and port number
Some third-party cameras may require the hostname and port number to be manually entered. This information is available from the local integrations dashboard below the toggle that enables integration. Buttons are available to copy and paste the information into the camera software.
Nureva App | Nureva Console cloud |
|---|---|
|
|
Note: The port number is configurable and can be set to an open port on the network.
Allowing device access to sound location data
Local computer connections are allowed by default. In some cases, allowing access to the sound location data for specific hostnames and IP addresses will be necessary. The additional hostnames and IP addresses can be entered into the field below the network integration settings information.
Note: Hostnames and IP addresses can be removed by clicking the ⊗ next to the entry.
Troubleshooting
If the Nureva App or Nureva Console is unable to start local integrations, a yellow notification with issue details will be shown.
Verify that the port is not already being used.
If the port is already in use, enter a valid number for an open port.
Verify that the hostnames and IP addresses have been entered correctly.
If errors are not being reporting, but local integrations are not functional:
Consult with the third-party camera’s technical support.
Contact the Nureva support team if additional assistance is needed.
Nureva Developer Toolkit
The Nureva Developer Toolkit offers easy-to-use APIs for Nureva devices. Through the toolkit, developers can access APIs for using sound location data with supported third-party cameras.