Follow these basic steps to set up and configure your Nureva® HDL200 system using the Nureva App to manage the audio system and its features. This article covers installation, connection, and initial settings to get your system up and running.
Step 1: Install the HDL200
Review the HDL200 system’s installation guide before installing the device. Important considerations such as the placement of the HDL200 system and required materials are outlined in the guide.
Step 2: Connect the HDL200
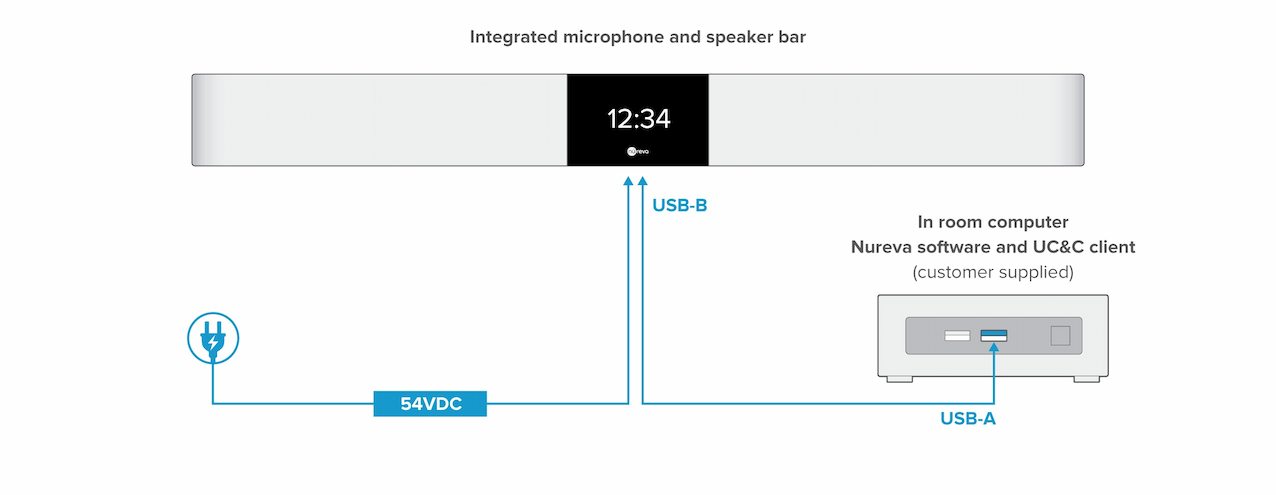
Connect the provided USB cable to the USB-B port on the HDL200.
Run the cable to the in-room computer, connecting to a USB-A port.
Join together the provided power cord with the power supply.
Connect the power supply to the HDL200 and plug it into a power source.
After the device is connected and switched on
Next, the HDL200 system will automatically calibrate. Please remain quiet in the room until calibration is complete.
Step 3: Update firmware with the Nureva App
Before starting
Set up the Nureva App to manage the Nureva system.
When calibration is complete, launch the Nureva App to ensure that the HDL200 system’s firmware is up to date. An update button will be available in the Nureva app if a firmware update is available.
A confirmation dialog will acknowledge that the device will not be available during the update process. Do not turn off the computer or unplug or disconnect the device until the update is complete.
Step 4: Set the HDL200 system as the default audio device
Setting the HDL200 system as both the default audio device and the default communication device ensures that it works seamlessly with all applications, especially unified communications platforms like Microsoft® Teams or Zoom.
Set a Nureva system as the default audio device
Step 5: Optimize the system
Adjust the HDL200 system settings for your organization’s unique space to help ensure optimal performance. All device settings can be returned to the system defaults at any time.
Optimize the HDL200 system settings
Enabling remote management
Nureva® HDL200 systems can take advantage of remote management and monitoring capabilities with Nureva Console. To make the connection between the physical device and Nureva Console, the device will need to be enrolled using an enrollment code. The enrollment code for HDL200 systems is generated using the Nureva App.
How to generate an enrollment code with the Nureva App
Enrolling the HDL200 system for remote management is optional.
Warnings and other considerations
Installing the HDL200 microphone and speaker bar in the positions listed below may cause overheating.
Do not install the HDL200 on tables, credenzas, countertops or other surfaces without using Nureva-approved accessories.
Do not block vents on the HDL200, as this will impede airflow and lead to overheating.
Ensure adequate space between all vents and other objects to promote airflow and cooling.
Do not operate the HDL200 while it’s placed on its back surface (with speakers directed upwards), as this impedes airflow.