The Nureva® HDL410 audio system features auxiliary ports on the connect module. They are used to send and receive audio streams from third-party devices. The auxiliary port options are found in the Nureva App (Devices) and Nureva Console (Settings).
Audio jack cabling
When using the auxiliary in and out ports it is recommended to keep the maximum cabling length to 6’ (1.8 m). This maximum cable length is suggested to ensure minimum noise is coupled to the signal. Installing the third-party equipment next to the connect module will help avoid long cable runs and proximity to noisy cables. This will assist with keeping noise coupling from happening.
Analog device cabling
When an HDL410 system is connected to external analog devices, all connections are unbalanced 3.5 mm connections with a three-conductor tip ring sleeve. This type of connection can also be used with external microphones when using Adaptive Voice Amplification.
External microphone cabling
External microphone connections can be balanced or unbalanced, however the HDL410 connect module supports mono inputs only when used with external microphones. It is recommended to use a balanced cable for external microphone connections.
Adaptive Voice Amplification tuning for the HDL410 system
3.5 mm pinout configurations | |
|---|---|
Analog device connection | External microphone - Adaptive Voice Amplification |
|
|
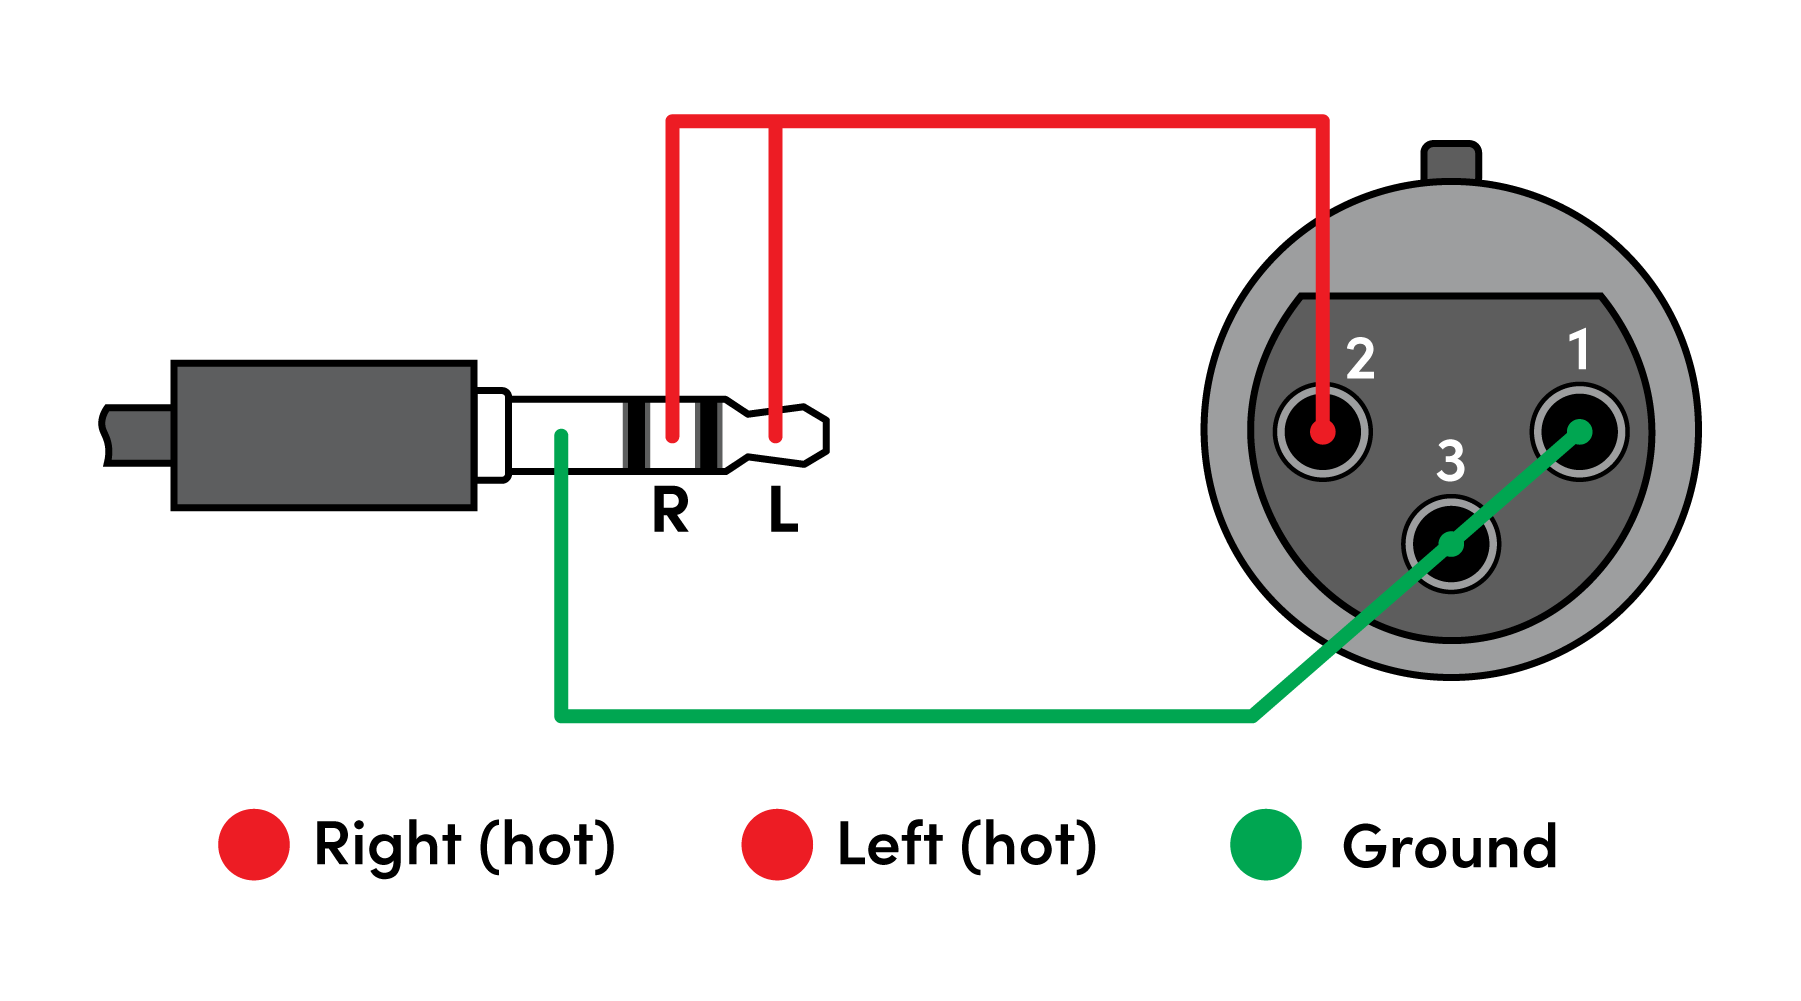
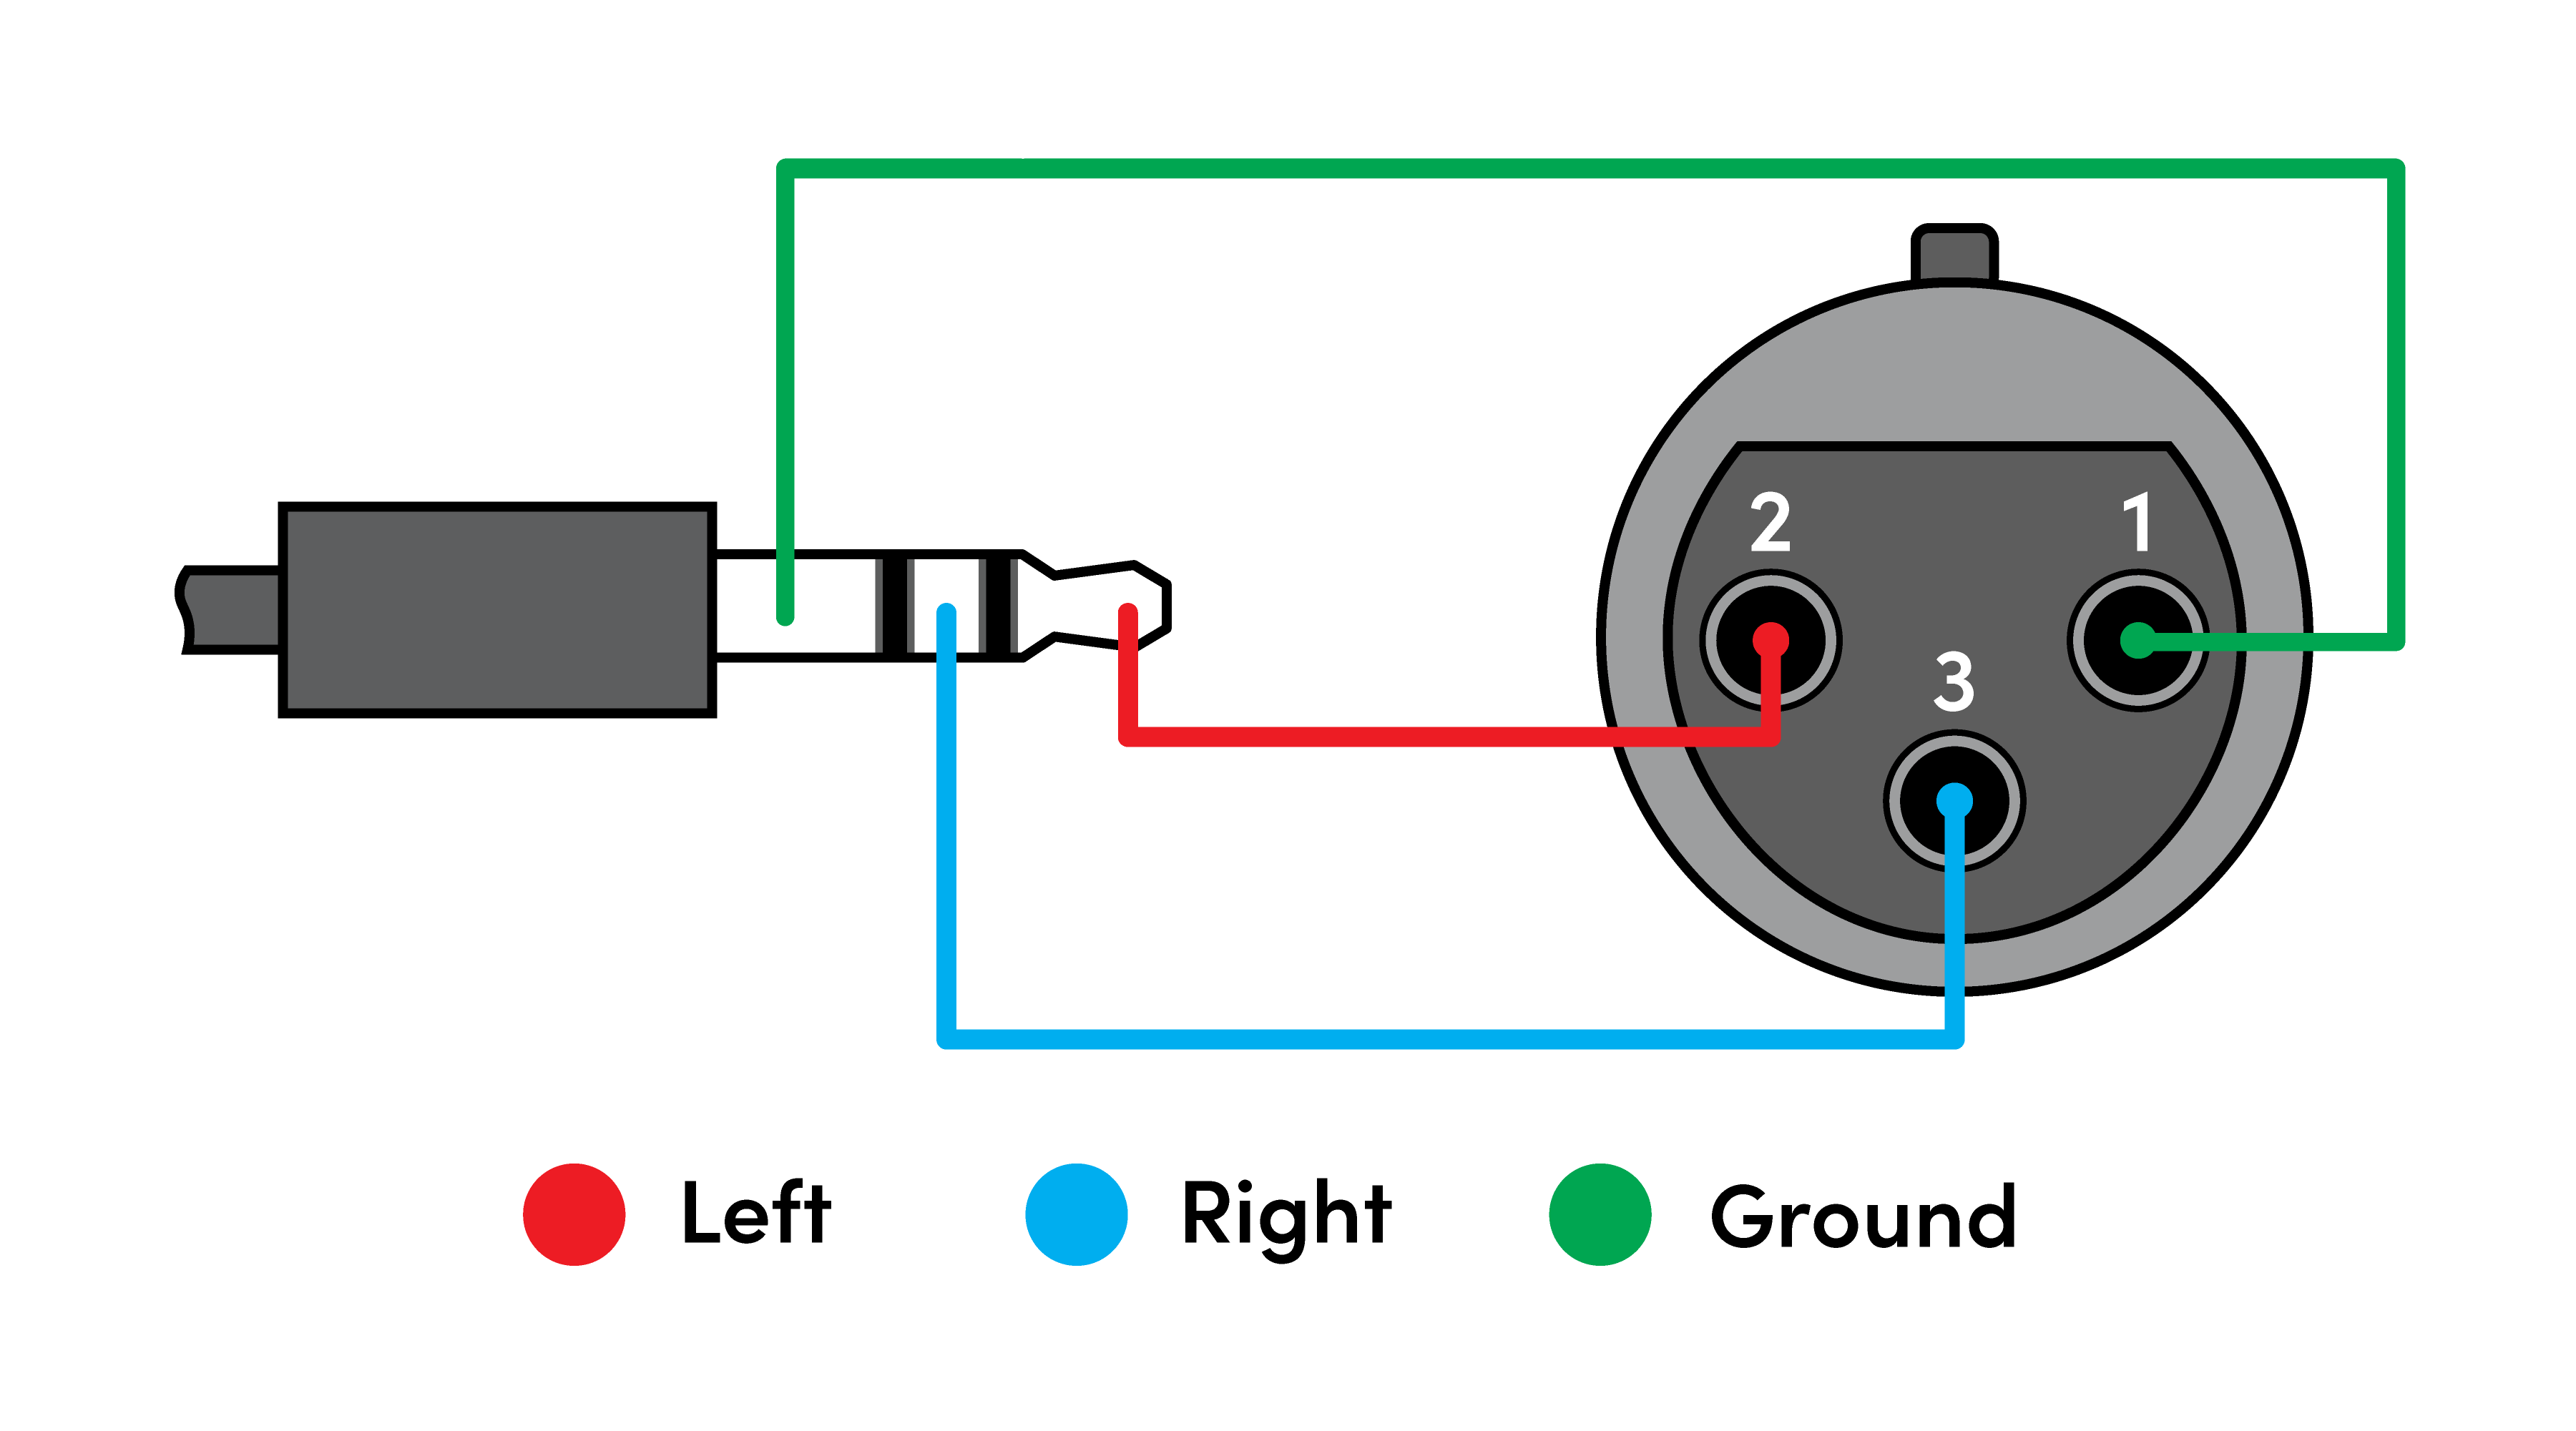
3.5 mm to XLR pinout — unbalanced connection | 3.5 mm to XLR pinout — balanced connection |
Auxiliary ports
Different auxiliary output modes can be selected for interoperability with different components. The table below outlines the voltage root-mean-square (VRMS) and gain for each port and the corresponding settings. The default signal is an echo-canceled microphone pickup with a maximum output level of 0.92 VRMS and a gain of 2.2 dBu.
Auxiliary ports | VRMS | Gain |
|---|---|---|
Aux out (mic level) | Max 0.23 VRMS (0.65 Vp-p)* | -10.5 dBu |
Aux out (line level) | Max 0.92 VRMS (2.60 Vp-p)* | +1.5 dBu |
Aux in | Max 1.00 VRMS (2.83 Vp-p) | +2.2 dBu |
* Assumes a 10k Ohm load |
The Nureva aux-in and aux-out connections are single-ended, unbalanced signals with default maximum output signals as shown in the table above. Using equipment that requires voltages below these levels may result in clipping, distortion and — in extreme cases — damage to connected systems.
Equipment that requires voltages above these levels will not be adequately driven by the Nureva audio system’s output signal. Using it may result in quiet or no audio on the channel. Before connecting to the Nureva connect module, make sure the third-party device voltage levels are adequate or adjusted properly by additional interfacing hardware.

Auxiliary out (mic level)
The mic-level auxiliary output contains the in-room microphone pickup that is echo canceled. In-room microphone pickup is also referred to as near-end or local audio.
Managing auxiliary out (mic level) — Nureva App and Nureva Console
The Nureva App and Nureva Console have the same steps when selecting Mic level for the auxiliary output.
Steps
When using Nureva Console, select the Room where the device is located before continuing with the steps.
Go to Devices.
If the analog device has not yet been added, add it:
Press the ⨁ button to add a device.
Select analog output device.
Select Mic level from the aux-out options.
Press Add device.
Once an analog device has been added, the auxiliary-out settings can be managed by opening the Devices page and selecting the applicable analog device.
Auxiliary out (line level)
The line-level auxiliary output contains the in-room microphone pickup that is echo canceled. In-room microphone pickup is also referred to as near-end or local audio. Line level is the default setting for Auxiliary out connections.
Managing auxiliary out (line level) — Nureva App and Nureva Console
The Nureva App and Nureva Console have the same steps when selecting Line level for the auxiliary output.
Steps
When using Nureva Console, select the Room where the device is located before continuing with the steps.
Go to Devices.
If the analog device has not yet been added, add it:
Press the ⨁ button to add a device.
Select analog output device.
Select Line level from the aux-out options.
Press Add device.
Speaker out (line level)
The line-level speaker output contains far-end audio for playback on external speakers. The output is a mono signal and the system’s speakers are disabled. USB sends near-end audio to the computer and far-end audio from the computer. For best results, the volume should be controlled from the computer and amplifier settings should be fixed.
Managing speaker out — Nureva App and Nureva Console
The Nureva App and Nureva Console have the same steps when selecting Speaker out for the auxiliary output.
Steps
When using Nureva Console, select the Room where the device is located before continuing with the steps.
Go to Devices.
If the analog device has not yet been added, add it:
Press the ⨁ button to add a device.
Select analog output device.
Select Speaker out from the aux-out options.
Press Add device.
Once an analog device has been added, the auxiliary-out settings can be managed by opening the Devices page and selecting the applicable analog device.
Mixed signal (line level)
The line-level mixed-signal output contains both near-end and far-end audio mixed into one signal. With a mixed signal, hearing aid transmitters can send both the in-room and far-end audio to hearing aid devices. This setting can also be used with third-party devices requiring a mixed near-end and far-end audio signal.
Managing mixed signal — Nureva App and Nureva Console
The Nureva App and Nureva Console have the same steps when selecting Mixed signal for the auxiliary output.
Steps
When using Nureva Console, select the Room where the device is located before continuing with the steps.
Go to Devices.
If the analog device has not yet been added, add it:
Press the ⨁ button to add a device.
Select analog output device.
Select Mixed signal from the aux-out options.
Press Add device.
Once an analog device has been added, the auxiliary-out settings can be managed by opening the Devices page and selecting the applicable analog device.
Speaker reference
Speaker reference is a setting for the aux-out port with acoustic tracking cameras where a reference signal from the in-room speakers is required. Enabling speaker reference mode allows an acoustic tracking camera to use the in-room reference signal to cancel out the audio from the speakers so the camera does not track to the speakers.
Managing speaker reference — Nureva App and Nureva Console
The Nureva App and Nureva Console have the same steps when selecting Speaker reference for the auxiliary output.
Steps
When using Nureva Console, select the Room where the device is located before continuing with the steps.
Go to Devices.
If the analog device has not yet been added, add it:
Press the ⨁ button to add a device.
Select analog output device.
Select Speaker reference from the aux-out options.
Press Add device.
Auxiliary in (line level)
The signals from the auxiliary-in port contain audio for playback to the room. They will get mixed with any signals from a USB audio source.
Managing auxiliary in — Nureva App and Nureva Console
The Nureva App and Nureva Console have the same steps when selecting Auxiliary in for the auxiliary input device.
Steps
When using Nureva Console, select the Room where the device is located before continuing with the steps.
Go to Devices.
If the analog device has not yet been added, add it:
Press the ⨁ button.
Select analog input device.
Press Add device.