The Nureva® HDX series is coming soon.
Technical support articles are being prepared ahead of HDX availability and may be updated as features, functionality and guidance evolve.
The Nureva® HDX audio system features balanced auxiliary Euroblock connectors on the system hub that let you send and receive audio to and from third party devices. You can configure these connectors in the Nureva App and Nureva Console.
Cabling recommendations
The auxiliary inputs and outputs use Euroblock connectors. When using the auxiliary in and out connectors keep the maximum cabling length to 100 feet (30.5 m). Keeping within the maximum cable length helps ensure minimum noise is coupled to the signal. Installing the third-party equipment next to the system hub will help avoid long cable runs.
To ensure optimal audio quality:
• Keep cable runs as short as possible to minimize noise.
• Place third-party devices close to the system hub.
• Avoid running cables near sources of electrical interference.
These practices help reduce noise and maintain signal integrity.
Euroblock terminal blocks
Each HDX system hub includes six pluggable terminal blocks to aid with making connections. Replacement terminal blocks can be used, as long as they are Euroblock compatible, 3.5 mm pitch and a plug type. The connectors provided with HDX systems are manufactured by Same Sky, part number TBP03P3-350GR.
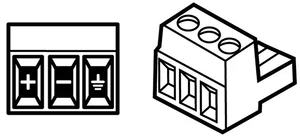
These 3-pin connectors are for balanced (differential) signals (positive, negative and ground).
Before you begin
You must add an analog device in the Nureva App or Nureva Console before the HDX system detects it and allows configuration of auxiliary input and output settings. The system supports both mono and stereo input and output devices.
Analog input ports
The HDX system hub includes balanced Euroblock input connectors. Connectors 1 to 4 can be used as individual mono inputs or paired together as stereo inputs.
Default level: 4 dBu (1.23 Vrms)
Input impedance: ≥ 10 kΩ

Mono input connections
• Channel 1: Mono input
• Channel 2: Mono input
• Channel 3: Mono input
• Channel 4: Mono input
Stereo input connections
Primary stereo inputs
• Channel 1: Paired with channel 2 as stereo left
• Channel 2: Paired with channel 1 as stereo right
Secondary stereo inputs
• Channel 3: Paired with channel 4 as stereo left
• Channel 4: Paired with channel 3 as stereo right
Setting up input port connections
Adding analog input devices
Important
When using Nureva Console, select the Room where the device is located before continuing with the steps.
Mono connection
1. Go to Devices.
2. Select the ⨁ (Add) button.
3. Choose Analog input device.
4. Select Mono as the connection type.
5. Choose the appropriate Port connection.
6. Select Add device.
Stereo connection
1. Go to Devices.
2. Select the ⨁ (Add) button.
3. Choose Analog input device.
4. Select Stereo as the connection type.
5. Choose the appropriate Port connections.
6. Select Add device.
Adjusting analog input device settings
After adding the device:
1. Go to the Devices page.
2. Select the analog input device.
Input signal level gain
• Use the input signal level gain slider to match the incoming signal level with the rest of the system.
• Play audio through the device while adjusting.
• Use the live signal meter to stay within the recommended range.
Proper gain adjustment ensures balanced audio across the system.
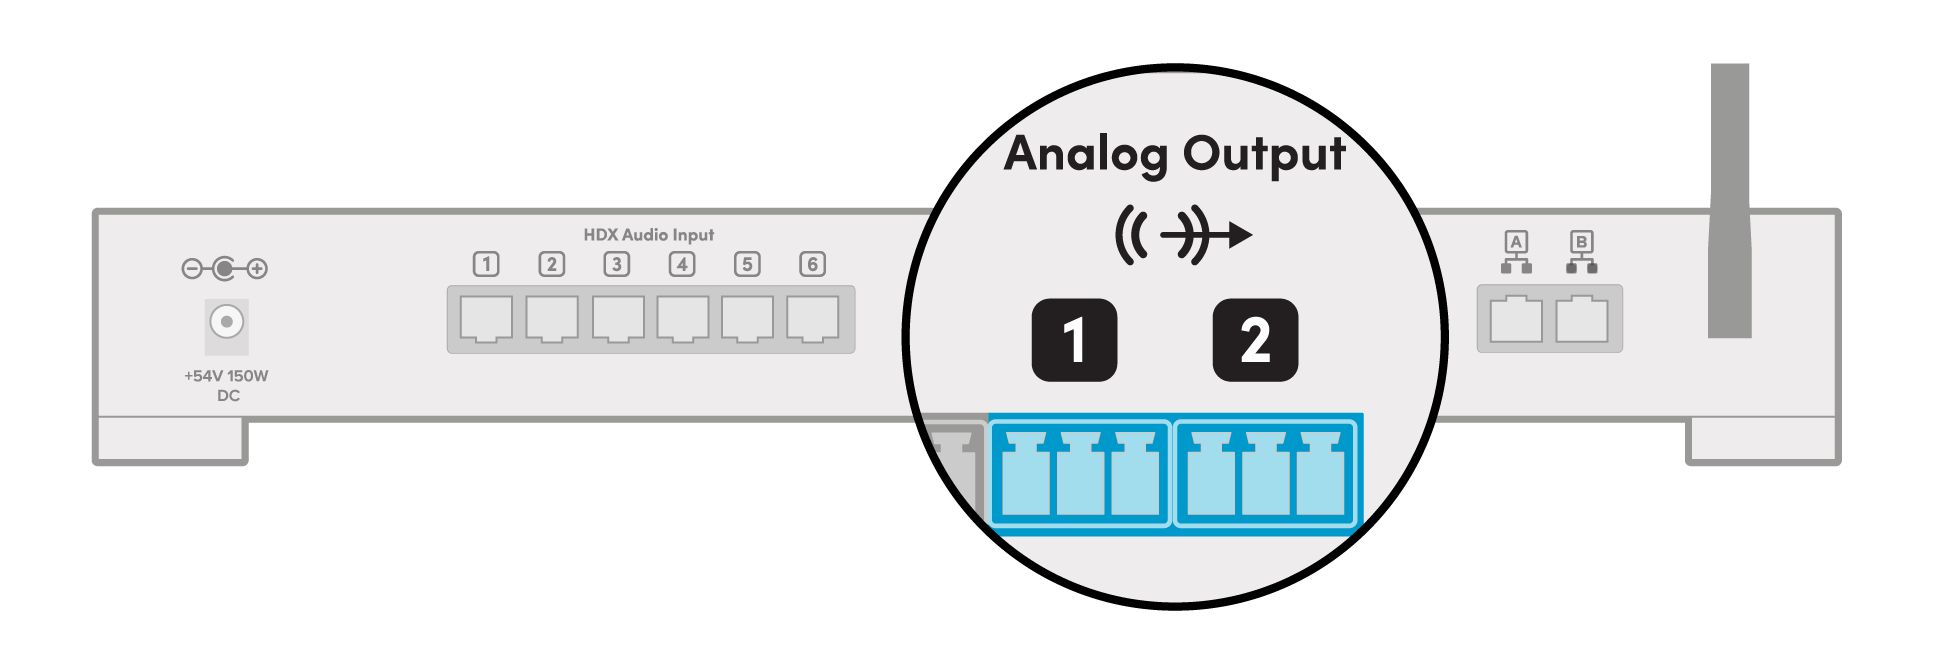
Analog output ports
The HDX system hub includes balanced Euroblock output ports. Ports 1 and 2 can be used as individual mono inputs or paired together as a stereo output.
Maximum level: 4 dBu (1.23 Vrms)
Output impedance: ≤ 100 Ω
Mono connections
• Channel 1: Mono output
• Channel 2: Mono output
Stereo connections
• Channel 1: Paired with channel 2 as stereo left
• Channel 2: Paired with channel 1 as stereo right
These outputs use two 3 pin male connectors.
Setting up output port connections
Important
When using Nureva Console, select the Room where the device is located before continuing with the steps.
Adding analog output devices
Mono connection
Go to Devices.
Select the ⨁ (Add) button.
Choose Analog output device.
Select Mono as the connection type.
Choose the appropriate Port connection.
Select Add device.
Stereo connection
Go to Devices.
Select the ⨁ (Add) button.
Choose Analog output device.
Select Stereo as the connection type.
Confirm the default port selection.
Select Add device.
Adjust analog output device settings
After adding the device:
Go to the Devices page.
Select the analog output device.
Mix
Choose which audio feeds are sent to the output device.
Select the desired audio sources using the available checkboxes.
Signal out gain
Use the signal out gain slider to control the outgoing signal level.
Noise suppression
Removes background noise and non speech sounds.
Applies only to HDX microphone input.
Enable or disable using the toggle control.