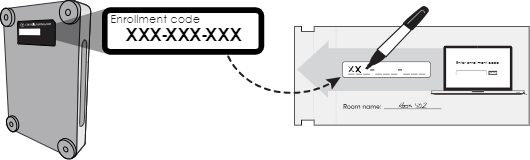
Locate and record the enrollment code
Nureva® Console allows for remote management and monitoring of Nureva audio conferencing systems. So that the HDL410 system can be managed remotely, the device must be enrolled into Nureva Console.
For the HDL410 system, an enrollment code is provided on a label found at the bottom of the connect module. This code is specific to the HDL410 system and cannot be used for other Nureva systems.
When the connect module is removed from the box, a card is attached to the top that is easily removed. On the card are places to write the enrollment code and a room name. Recording this information on the card allows for easy reference later.
Step 1: Install the HDL410
Review the HDL410 system’s installation guide before installing the device. Important considerations such as the placement of the microphone and speaker bars and required materials are outlined in the guide.
Microphone clearance requirements and recommendations
Quick start guide — HDL410 system
HDL410 microphone and speaker bar placement guide
Step 2: Connect the HDL410
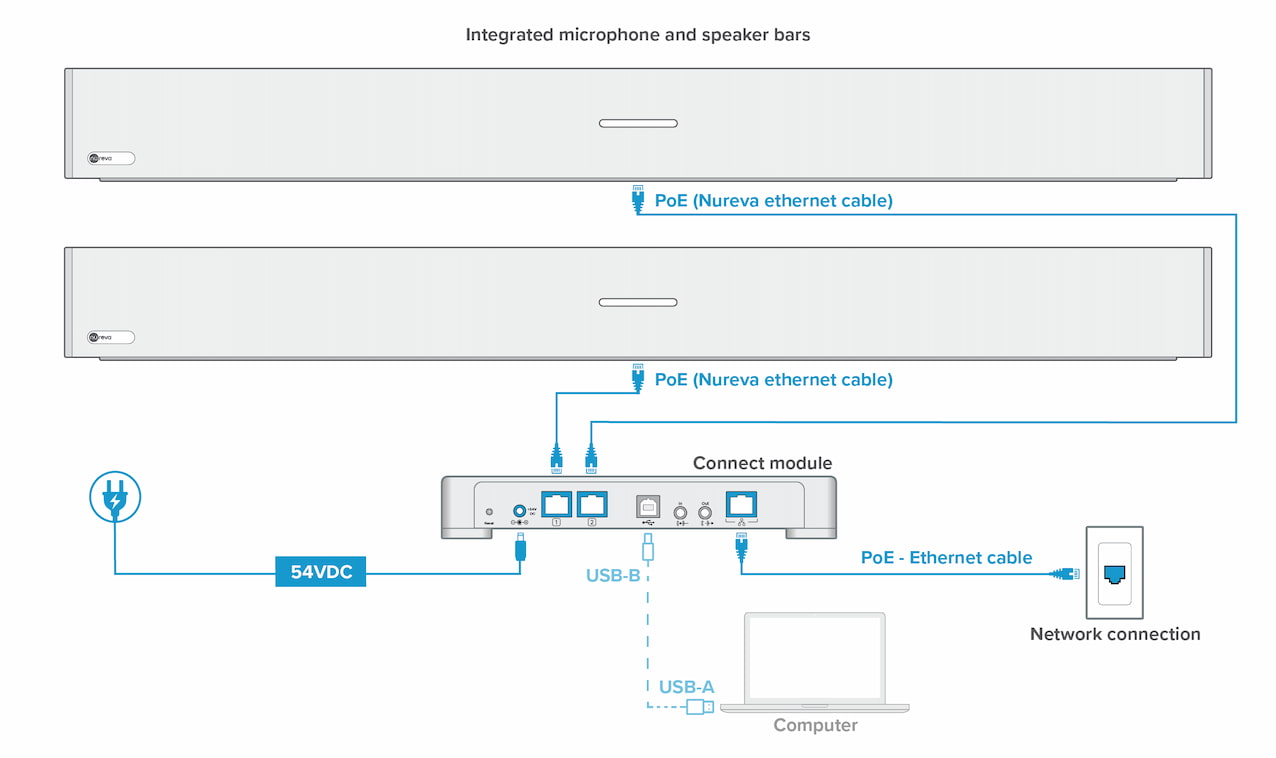
Connect the provided Ethernet cables to the RJ45-1 and RJ45-2 ports on the connect module.
Run the Ethernet cables to the RJ45 ports on each microphone and speaker bar.
Connect a CAT5e Ethernet cable (not supplied) to the network port on the connect module.
Plug the CAT5e Ethernet cable into a network connection (router, modem, wall jack).
Connect the provided power cord to the connect module and plug it into an outlet or a power bar.
Step 3: Connect a computer
To participate in an audio or video conference, a computer is required.
Connect the provided USB cable to the USB-B port on the connect module.
Run the cable to the computer, connecting to a USB-A port.
After the conference has been completed, the computer can be disconnected from the connect module.
Step 4: Enroll the HDL410 system
Nureva Console allows for remote management and monitoring of Nureva conferencing systems. The device will need to be enrolled into Nureva Console to make the connection to the physical hardware and be able to manage it online. Below are the steps for enrolling an HDL410 system into Nureva Console. An internet connection is required to enroll an HDL410 system.
Note: This article outlines the steps for enrolling an HDL410 system. For information about enrolling other Nureva systems, see How to generate an enrollment code with Nureva Console client.
Set up a Nureva Console account
Before an HDL410 system can be enrolled into Nureva Console, an account will need to be set up. A computer will be required to set up the account. If there is already an account for Nureva Console, advance to Create an organization below.
Go to console.nureva.com in a supported browser.
Select Create an account.
Complete all the fields and setup steps.
Enter the email address.
Enter a first and last name.
Create a password.
Agree to the Nureva terms of use.
Opt in or opt out of email notifications.
An email will be sent to the email address.
Click the Create account button at the bottom of the screen.
Check email.
A verification email will be sent to the email address.
Check the junk or spam folder if the email is not in the inbox.
Select Verify in the email.
You will be directed to the sign-in page for the account.
Create an organization
Before an HDL410 system can be enrolled, the user must log in to a Nureva Console account that is linked to an organization. When logging in to a Nureva Console account for the first time, the user will be prompted to create an organization. If the account already has an organization in place, advance to Enroll the HDL410 system below.
Go to console.nureva.com in a supported browser.
Enter the email address and password.
Select Sign In.
Follow the on-screen prompts to complete creating an organization.
After entering the organization name, click the Create button.
The organization will be linked to this user account and enrollment can begin.
Enroll the HDL410 system
In the Rooms dashboard, click the Enroll Device button.
Enter the enrollment code from the connect module and click Next.
Select Allow from the pop-up window in the browser to continue with device enrollment.
Enter some room details such as the room name, type, capacity and tags to help identify the device and the room within the organization.
Click Save.
The HDL410 system will appear in the list of devices and can be managed online.
Enrolling an offline HDL410 system
An offline HDL410 system cannot be fully enrolled. The enrollment code can be entered and will be accepted, prompting the completion of the room setup. After the room setup is completed, Nureva Console will advance to the Rooms dashboard. The room will be shown with an unknown device listed as enrolling.
After the HDL410 has been connected to the network and it is accessible by the cloud application, Nureva Console will complete the enrollment.
Problems enrolling?
If the HDL410 system cannot be enrolled, the information below will help with troubleshooting.
The specific enrollment code for the HDL410 system must be used.
The enrollment code is found at the bottom of the connect module.
Enrollment codes for other Nureva conference systems are not valid with the HDL410 system.
The HDL410 can only be enrolled into one account at a time.
Check the status indicator lights on the connect module.
Check the Ethernet cable is connected to the network.
Use the network connectivity tool to check the network configuration.
The HDL410 system features status indicator lights on the front and back of the connect module. The indicator lights can help troubleshoot issues with the system and confirm the HDL410 is ready to be used.
 Front view
 Back view
If enrollment is not successful, check the status indicator lights on the connect module and refer to the information found in the HDL410 status indicator lights article.
Contacting technical support
Contact Nureva technical support if the following applies:
The enrollment code is not accepted when entered.
Enrollment does not complete and none of the status indicator lights show an error.
Errors occur when creating a Nureva Console account.
Step 5: Update device
The HDL410 system will be unavailable for calls during the device update. Please do not turn off the computer or unplug or disconnect the device.
Nureva Console indicates the version of each enrolled device. If an update is available, notifications will be provided, including the notifications listed below:
The USB connection indicator light on the connect module will be solid yellow.
A blue update icon will be shown in the device version column of the Rooms dashboard.
To update the device, take the following steps:
Click the three dots in the Actions menu and select Update device. A confirmation dialog will appear to acknowledge that the device will not be available for calls during the update process.
Click Update to continue. The download and update process will commence. When completed, the new device version will be visible.
Local device management
By connecting a USB cable from an HDL410 system’s connect module to a computer, the HDL410 can be locally managed through the Nureva App. This method is available as an alternative to managing the HDL410 over a local area network or direct Ethernet connection.
Learn more about using a USB connection with the HDL410 system.