How to adjust a CV30 camera
- 25 Apr 2024
- Print
- PDF
How to adjust a CV30 camera
- Updated on 25 Apr 2024
- Print
- PDF
Article summary
Did you find this summary helpful?
Thank you for your feedback
The Nureva® CV30 camera has two options for adjusting settings. The first option is through the remote control and onscreen menu. The second option is through the Nureva Console desktop client.
Option 1: Adjust camera using the remote control
Before starting:
Launch a videoconferencing application (e.g., Microsoft® Teams or Zoom).
Go to the settings menu in the application.
Within the settings menu, go to the device settings.
Ensure the CV30 camera is selected.
The remote control is used for:
Adjusting the camera view
Storing preset camera views
Turning tracking on and off
Adjusting the volume on Nureva audio systems
| Opening the menu
|
 | Home
|
| Tracking
|
 | Camera presets
|
 | Arrows
|
 | Zoom in and out
|
 | Volume and mute
|

Option 2: Adjust camera using Nureva Console client
Using Nureva Console client is an alternative to using the remote control to adjust the live camera view. The advantage is that there is a live camera view available in Nureva Console client. The live camera view has buttons overlaying the view for easy adjustments.
To begin adjusting the CV30 camera view:
Open Nureva Console client and select the CV30 from the device list.
The CV30 device page will load and a live camera view will appear.
Initial CV30 camera connection
When the CV30 camera is connected for the first time, the camera view will load 100% zoomed out, which is the full view. Clicking on the zoom-in button (1) or zoom slider (2) will make the other controls accessible.
Adjusting the camera view
After the live camera view has loaded, the CV30 camera view can be adjusted. The available adjustments are zooming in or out, panning left or right and tilting up or down.
If automated tracking is enabled for the CV30, the camera view controls will not change the camera view. Turning off automated tracking with the remote control will allow the camera view to be adjusted. Automated tracking can be turned off using the tracking button at the top-right corner of the remote control.
When the CV30 camera is being used by another application, the camera view is not available. A notification that the camera is in use by another application will appear. Closing the other application or stopping it from using the CV30 will restore the camera view within Nureva Console client.
Use the buttons overlaying the camera view to adjust the camera to the preferred setting.
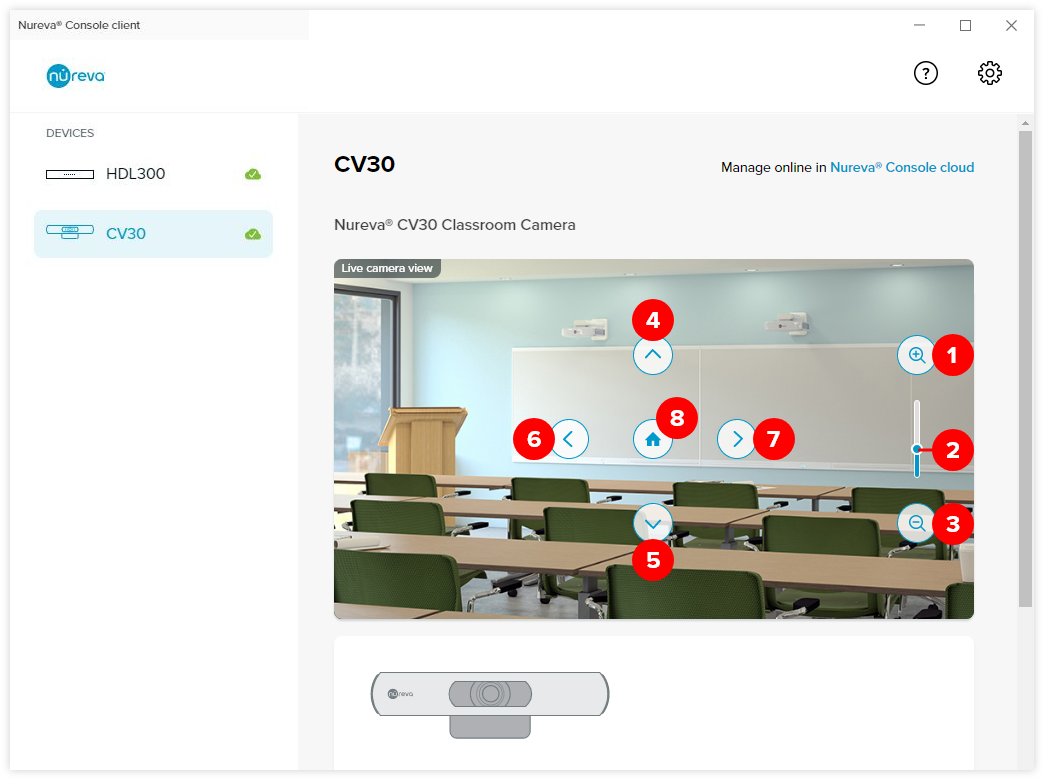
Remote control number | Remote control description |
|---|---|
1 | Zoom in |
2 | Zoom slider (slide up to zoom in and slide down to zoom out) |
3 | Zoom out |
4 | Tilt up |
5 | Tilt down |
6 | Pan left |
7 | Pan right |
8 | Home (100% zoom out) |
Note: The remote control can still be used in conjunction with the controls in Nureva Console client. The controls will not be functional if automated tracking is enabled.
Was this article helpful?